 |
| After one day soaking an increase in MC of 11% |
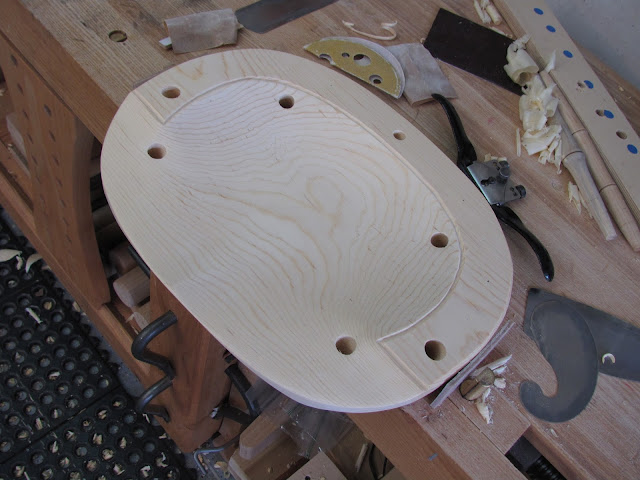
I moved onto finishing the carving of the seat. The seat on a Sack Back is called and oval seat and the grain runs from side to side. On a kids chair I carve the bowl to approximately 3/4" deep. I like to have the area where the legs cross over the front of the seat about 1/2" lower than the spindle deck. This makes for a very comfortable chair that does not cut off the circulation to the legs.
I did not remove the extra wood on the back of the seat so I had plenty of material to clamp in my bench's leg vise in order to work on the front and sides of the seat. I used my bevel up draw knife to make the relief cut to the front of the seat that gives it its distinctive profile. I then used a drawknife and spoke shave to fair the curve on the sides of the seat.
 |
| Front of the seat. |
Next I removed the excess material from the back of the seat blank. I then took great care in clamping the seat in my vise and finished fairing the curve around the back of the seat. My leg vise chop and the portion of the bench face covered by the chop are lined with leather. This is to aid in gripping and helps to keep from damaging the material being held in the vise. A note of great importance; When clamping in a bench vise, a seat blank that has been cut to size and carved, ALWAYS clamp on the spindle deck. NEVER clamp onto ANY PART of the carved seat. Don't ask me how I know this will save you grab mental anguish.
Next I removed the material where the legs cross over the front of the seat. To do this I used the drawknife, scorp, travisher and spokeshave, taking light and deliberate cuts. It was ultra critical to pay close attention to the grain. With so many undulations in this area it was very important to ensure I was cutting downhill with a skewed blade. A slip or misguided cut at this stage could result in a tear out that may not be able to be repaired.
I then finished up with several shaped scrapers and sand paper. On some of my first seats I didn't use sandpaper. Curtis Buchanan explained that the seat was the largest surface on the chair and naturally draws ones eye to it. For this reason, Curtis scrapes and sands to ensure the finish is at a very high level. At this point I close my eyes and run my fingers over the seat surface. I have learned that my eyes do not see the surface as well as my fingers can feel it. The slightest bump or dip is easier to find and fix.
 |
| Circled areas are slightly higher than the surrounding surface. I could not see them but I could feel them. |
After sanding the seat bowl down to 120 grit I planed the spindle deck with my No. 4 hand plane, re-carved the gutter and set the seat aside. Next I turned the four legs, two side stretchers and the medial stretcher. I am using bamboo turnings for this chair. The double bobbin turning is sometimes misidentified as the bamboo turning.
 |
| Finished Seat |
 |
| Bamboo leg turnings |
 |
| Four different type turnings from left to right: Baluster; Blunt Arrow or Ball & Cylinder; Bamboo; Double Bobbin w/A Bead |
Tomorrow I will check on the soaking oak and begin to put the undercarriage together and attach it to the seat.
~ Ray Schwanenberger
No comments:
Post a Comment